Friday, March 1, 2013

Help! I'm Winning!

We have all been lucky enough to either make a few great shots, or have a few misses from our opposition, and be staked to an early lead. This might seem like a gift, but an experienced curler will tell you that defending a lead is one of the most difficult things to do in the game. With the addition of the four-rock rule, the continued improvement of ice and rocks to create significant curl, there are lots of factors that encourage offensive play in the modern game. 

So, if you are staked to a large lead, how do you defend it? How do you keep your opponents from fighting their way back?

1. Keep it clean.

When you are winning, rocks in play are not your friend - no matter which team they belong to. So when your lead is shooting, avoid throwing guards. Bring your rocks into the house, or if you want to be really safe, throw them right through the house and out of play. When it comes to your second's rocks...

2. Peel the guards.

Your opponent's first move in their attempted comeback will be to throw guards. The best move to counter this is to remove them from play. A "peel" is when you hit a guard out of play and also roll your shooting rock off the sheet as well. Some teams shy away from peels because they feel they can't throw enough weight to make the shot. While it may be easier to throw a peel if you can throw it hard, peels can actually be completed successfully with as little as hack weight. It's all about hitting the rock in the right spot, and making sure your shooter is swept right out of play. Peeling guards out of play will make your life a lot easier when you are trying to maintain a large lead.

3. Group the stones.

Once you have worked your opponent's guards out of play by employing the peel, they will likely have a couple of rocks in the house. This is ok: even if they have two rocks in the house, if there are no guards you will have very simply shots moving forward, with low risk of giving up a big end.

As you move forward in the end, you can try to eliminate multiple rocks at a time. In order to throw these double, or triple takeouts, you may have to begin by grouping the rocks. To do this you should try and pull all of their rocks together in the house.

As you can see in the picture, if your opponent has "split the house", or thrown rocks on opposite sides of the circles, by hitting and rolling to the middle you are pulling the rocks in the house closer together. If you have a chance to hit multiple rocks at a time, take a shot! Remember rocks in play are not your friend, so keep hitting as much as possible.


So, the next time you find yourself with a big lead on the scoreboard, do yourself a favour and remember to keep it clean. Peel as many guards as you can, group the opponent's stones in order to create double-takouts, and this will limit the chances of giving up a big end, and leaving the door open for your opponent to get back in the game. 


Friday, February 15, 2013

Help! I'm Losing!

Over many years of curling, I have had my share of losses. While these losses are always an opportunity to learn, it is always a lot more fun when the games are close, or when you are winning. So what can you do if you find yourself down by multiple points?

The first thing you want to remember is that a rock in play is a rock that you can use. So, if you have the hammer, don't be afraid to keep some of your opponent's rocks in play. You may have to make a difficult shot later in the end, but if you leave the rocks for the beginning of the end, the better you can set up your scoring opportunity. 


When you have the hammer, look to set up your corner guards. For a separate post on where to put corner guards, and how to use them, read The Good and Bad of the Corner Guard

As you can see in the diagram, the losing team (the red team) has set up two well-placed corner guards. The winning team (the blue team) has countered by throwing both of their lead rocks into the four foot. It might be tempting for the red team to hit these rocks in the four foot, however this is not the best way to generate some points. Instead, use the corner guards you just put up. Your opponent is going to work hard to peel those guards off the sheet, so try and get one or more rocks behind.

When it does come time to move the rocks around in the four foot, maybe on your vice's rocks, try moving them into the back of the house, as opposed to taking them out.

Now you will likely be looking at a situation like the one on the left. One of your corner guards has been removed, but you were able to hide a draw behind the other one. You have also managed to tap both of their rocks behind the tee line, and kept your shooter in play in front of them. Since it is getting late in the end, you might be worried about the face that your opponent is shot rock. But, this is the risk you have to take to score some points! If your opponent tries to remove the red rock in the middle of the sheet, they may jam it into their blue rocks. This is the fastest way for you to get three rocks in the house, and be on your way to getting some points on the board.


When you don't have the hammer, you should also look to keep some rocks in play, but you have to be ready to bail out if your plan isn't working out.

As you can see in the diagram, the losing team (orange team) has thrown two centre guards. Throwing one guard isn't enough because it is just too easy for it to be removed, and your chance at stealing to be over.

As the orange team was throwing their centre guards, the wining team (purple team) has tried to counter this move by throwing their rocks into the four foot. This is an opportunity for you to use their own rocks against them.

Begin by freezing to these rocks, as shown. Then, when bump the opposition rocks behind the tee line, while keeping them in the four foot. If you can create a wall behind the tee line, with your rocks in front of the wall, you are well on your way to squeezing down the scoring zone, and maybe stealing back some points.


So if you find yourself losing, remember these tips! Here is a quick reminder:

  • Use your opponent's rocks against them. Bump them behind the tee line to create some backing.
  • Get guards up in front of the house. Two corners with the hammer, two centre guards without. 
  • Don't Panic! Take some chances with rocks in play. Sometimes when you get down on the scoreboard you have to take some risks to get back in the game.


Sunday, February 10, 2013

Curling Drills

In order to improve your curling game, like any other sport, practice is key. If you aren't sure about when you can find some free ice at your club, speak to your ice-maker or club president - there is almost always some free time every week for you to get out on the ice and improve your skills. Often in curling practicing means working on perfecting your slide, but in order to work on other team skills, it is a good idea to use some drills that work on multiple skills. Here are some of my favorites for you to try!


Crazy Eights

This is a drill for working on takeouts. The drill begins with all eight rocks of one curling being set up as shown in the diagram. The goal is for a team of four to remove all eight of these rocks, while keeping their eight shooting rocks in the house. Any shooting rocks left in the house at the end of the drill are a positive point, while any opposing rocks left behind are a negative point, making the high score a +8.

All four members of the team should participate, with the skip calling the line, sweepers sweeping, and taking turns throwing their two rocks. This drill forces a team to work on throwing consistent takeout weight, hitting the broom, judging the amount of curl, and setting up angles for double takeouts.


Line Dancing

This drill requires the participating team to throw eight soft-weight taps into the house. Eight rocks are set up in a straight line in front of the house, as shown in the diagram. The team now has eight rocks to throw, attempting to tap the stationary eight into the house. 

All four members of the team should participate, with the skip calling the line, sweepers sweeping, and taking turns throwing their two rocks. Teams will be required to figure out the appropriate tap weight, and ensure that line of delivery is accurate in order to effectively complete this drill. 


Pop Goes The Weasel

In this drill, eight rocks of one colour are arranged in a long line, starting at the very top of the house, as shown in the diagram. The rocks should be touching to begin the drill. The objective is to tap the rocks progressively so that all eight end up in the house. 

Thrown rocks may, or may not be removed from play after shot, depending on how complicated you would like to make the drill.

All four members of the team should participate, with the skip calling the line, sweepers sweeping, and taking turns throwing their two rocks. Teams will need to focus on throwing the appropriate weight, while also making sure to hit the rocks in the right place - the further you spread out the rocks as you progress, the more difficult it will be to get them all into the house. 


Progressive Hog Line

This drill requires teams to throw eight draws. The difficulty is that each draw must go further than the draw before it. As shown in the diagram, this means that essentially the hog line moves up with every rock that is thrown. The first rock should be as high as possible, leaving the maximum room for the next rock. However if the first rock is thrown tighter to the house, the imaginary hog line moves that close, leaving less room for the other seven rocks to be placed. As a rock lands it should be pushed to the side of the sheet, to signal the imaginary hog line. As with the real hog line, a rock must fully cross the previous rock in order to count. 

All four members of the team should participate, with the skip calling the line, sweepers sweeping, and taking turns throwing their two rocks. This drill works with a thrower's draw weight, but the most important factor is sweeping: the sweepers must make sure they place each rock past the previous, but yet as close to the previous as possible. 


Hot Shots!

The hot shots is a competition that is played every year at the national championships. There are six shots to be thrown, each of which is worth a maximum of five points. 

All four members of the team should participate, with the skip calling the line, sweepers sweeping, and taking turns throwing their two rocks. The first rock each player throws should be a "practice" rock, which will not count for points. The second rock each player throws will be the counting rock. After every shot the shooting rock is removed from play, and any necessary rocks are reset for the next shooter. 

For most of the shots, points will be scored as indicated in the diagram. Five points will be awarded if the rock rests on the button, four if it ends up in the four-foot, three for the eight-foot, two for the twelve-foot, and one point if the rock is in play, but not in the house. There are a few differences for the one-point option, which I will explain as it comes up below. 

Each player shoots six shots, with a possibility of scoring as many as 30 individual points. This drill can be used to count individual score, or a team score, looking for a maximum of 120 points. 


Shot A: Draw to the Button

This is the most straight-forward of any of the Hot Shots. Without any rocks in play, the player must try and draw to the button, with points awarded depending on where the rock lands. 

Shot B: Draw Through The Port

Essentially the same as the draw to the button, but this time the rock must travel through the two guard rocks, which are set-up as shown by the purple rocks in the diagram. If the travelling rock touches either of these rocks at any time, zero points will be awarded. If the rock travels through the two rocks, but does not end up in the house (short of the house, or through the house) one point is awarded. 

Shot C: Tap

For this shot a rock is set up a couple inches in front of the house, on the centre line. If the set rock is touched at all, even if it goes out of play, one point is awarded. If the tapped rock ends up in the house, points are awarded on the same scale as was used with the draw shots. 

Shot D: Hit and Stick

As shown in the diagram with the green rock, the stationary rock is placed at the very back of the button, on the centre line. The stationary rock must be fully removed from play in order for any points to be scored for this shot. One point is awarded if both rocks end up out of play, and more points are awarded according to where the shooter comes to rest in the house. 

Shot E: Double Takeout

Two stationary rocks are set-up as shown by the blue rocks in the diagram. The shooter must remove both rocks from play in order to score a point, and then points are awarded if the shooter sticks in the house. If all three rocks leave play, one point is awarded.

Shot F: Hit and Roll 

A rock is set-up at about the 2 o'clock position, outside the house, as shown by the yellow rock in the diagram. The shooter must remove that rock from play, in order to score one point. A higher score can be achieved if the shooter rolls into the house, with points awarded on the same scale as the previous shots. 

Saturday, February 9, 2013

The Good and Bad of the Corner Guard

The corner guard is perhaps the unsung hero in the game of curling. It doesn't always have the impact on an end of a centre-line guard, the dramatic flair of a draw to the button, and certainly none of the razzle dazzle that comes with a big weight runback. But the best thing about a corner guard is that if you employ it properly, when you have the hammer, it is a low-risk, high-reward weapon that can help you on the way to a victory.

As I said above, you must employ the corner guard properly for it to be effective. The low-risk side of the guard is that it does not close down your opportunity to draw to the four-foot with your final rock of the end. The high reward that comes with a corner guard is that you have something to hide rocks behind - the more rocks you have in the house, with an open four-foot, the more likely you are to score multiple points. Here the corner guard can be an offensive force. This begins with rock placement. In my opinion, there are two main places you want to place your corner guard.

First Option: Tight and Close. 


In this first option, you bring your corner guard close to the house, right around the four-foot line. This leaves you with multiple options as the end progresses. First, you can tap this rock back, or run it back into an opponent rock, as indicated by the red arrow. Since it is nice and tight to the rings, the runbacks become that much easier.


But, since it is on the four-foot line, you are also able to draw into the four-foot from the open side, but also from the outside, as shown by the green arrow. The key to the corner guard is that it is low risk. When you have the hammer the ideal situation is for the centre of the ice to be open, leaving an easy draw to the button if anything goes wrong. This corner guard does have some risk - while it leaves a draw on both turns, it makes one turn slightly more difficult. However sometimes to score some points you need to take a little bit of risk. Throwing this guard gives you a good chance to score multiple points, without taking a whole lot of risk. 


Second Option: Wide and Half-Way.

This is one of my favourite rocks to utilize when I am skipping. In this case the rock is about halfway between the house and the hog line, covering the outside edge of the eight-foot, and all of the twelve-foot. This guard is high enough that you can bury multiple rocks behind it, but not so high that an opponent can tap out a buried rock.

Since it is farther away from the house, it is more difficult to use as a rock to tap or runback, but the true beauty of this guard is that there is essentially no risk in throwing it. As the green arrow shows, there is room to draw to the button past this guard. This means that even if everything goes wrong in the end, this guard is not in the way of your bail-out draw to the button on the last rock.


The Bad: Getting In The Draw Path. 


The biggest mistake you can make when throwing the corner guard is to leave it halfway Option One and Option Two. In this scenario, you are blocking the path the button on one half of the sheet. This essentially means that your opponent only has to worry about cutting off the other side of the sheet, and then you are in a world of trouble when it comes to skip's rocks. 

A corner guard in this situation is arguably worse than even throwing a centre guard. But, it is only a few feet away from either option above, so you are likely to face this scenario if you attempt the corner guard often.

If it ends up here, what can you do to help yourself out?


Making Good From Bad: Tap and Roll


I give the same advice here that I do if you accidentally throw a centre guard when you have the hammer. On your next shot, simply tap this poor guard into the house, and roll the shooter into a better location. Instead of playing with a bad guard, make two good shots with one throw: get a rock in the house, and get a corner guard in a great location.

Now that your corner guard is in place, use it well. Some teams know where to throw their corners, but then they forget about them for the rest of the end. Obviously your play may change a bit depending on what your opponents are making, but the corner guard can be your ace in the hole: it is a low-risk, high-reward chance to put some points on the scoreboard!


Tuesday, February 5, 2013

Introduction To Curling Strategy

"Plan your work, and work your plan."

Legendary football coach, and Superbowl trophy namesake, Vince Lombardi best described a team strategy by saying "plan your work, and work your plan". The idea works the same in curling as it does in football. An essential element of our sport is the ability to decide what plan to pursue, and how exactly to pursue it. This is called strategy. 

This diagram displays the general idea for what strategy should be played when a team has the hammer, and when a team does not have last-rock advantage. 


The image shows that when you have the hammer, it is best to keep the middle of the sheet open. This way, if things get complicated the final skip's rock can always be used to draw to the button to win the point. 

Without hammer, your strategy should be to make the last shot of the end as difficult as possible for the opponent skip. Throwing rocks towards the centre, and cutting down the scoring area for the last rock is the best way to pursue this goal. Ideally, the opponent will not have a way to get to the button with their last rock.

When losing (down) it is a good idea to keep a lot of rocks in play, in an attempt to force your opponents into playing more difficult shots, while hoping for a miss. To accomplish this, keeping guards in front of the house is a good idea. These rocks give you more scoring options, as they can be run back, tapped in, or used as a guard to hide behind. 

When you are winning (up) the goal should be to keep things as simple as possible. Since you don't need to score a bunch of points, bring play into the house. Avoid guards, and when they do get thrown don't be afraid to peel them off the sheet. Playing open hits in the house is the ideal in this scenario. 


This is the general idea that most teams pursue, however strategy is an ever-evolving aspect of the game. No matter what strategy your team decides to follow, it is important that you have a predetermined plan that you can implement when you hit the ice. 

Lead Rocks: Where Do I Go?


I have always said that maybe the most important rocks of an end come right at the start: the lead rocks. While these shots aren't always as complicated as some shots that may come later in the end, they are vital in establishing the team's plan for the end. A well-placed lead stone can really pave the way for a team in completeting their desired result for the end. Conversly an ill-placed stone may have that team chasing right off the bat.
So the question is, where should I put my lead rocks? The answer depends entirely on your team's goal for the end. These goals should be established in team practices before the game, and then quickly reiterated before an end begins.

Without the Hammer

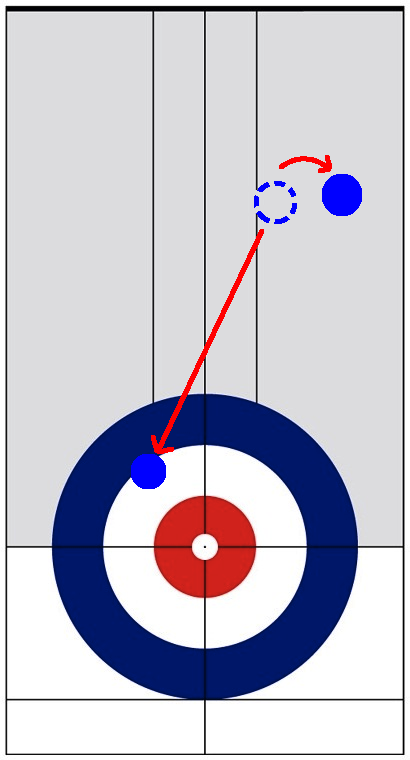
Option One: Throw a Guard
Without the hammer, your goal could be to steal. This will happen often when you are losing in a game, or sometimes when the game is close. In order to steal, you will want to place your lead's first rock in the free guard zone, on the centre line. The second lead rock will then be a come-around to land behind that guard. This set-up closes down the scoring area for your oppenant, bringing play into the centre of the ice, and into the four-foot circle. The smaller you can make the scoring area, the greater the oppourtunity you will have to steal the end.
If you are really desperate to steal, you will want to place two guards on the centre line, so you must leave room for this to happen. Many teams will throw their first guard close to the house, on the centre line for the first lead rock, with the second lead rock being a guard of that guard, further away from the house and close to the hog line. With these two guards in place, the opponent will have a more difficult time clearing the front of the house, which will often be their goal.

Option Two: Draw Into the Four Foot
As I said, your goal for an end where you don't have hammer will not always be to steal the end. In many situations going for the steal is too risky, and therefore you should be working simply to limit your opponent to one point. For this plan, many teams choose to throw the first rock of the end into the top of the four-foot. This forces your oppenent to choose one of two options:
1. Hit the rock. This will likely result in an exchange of hits for the duration of the end, with a very open house.
2. Throw a corner guard. You will likely respond with a centre guard, and then the end gets complicated. You have a chance to steal because of your set-up, but they also have a chance to score two, because there are multiple rocks in play.
Another option is to throw that same centre guard, as if you needed to steal, but be ready to bail out as soon as you need to. This can be aided by bringing the guard as close to the house as possible: a short run-back is almost easier than a long run-back. This is usually a good game plan for a close game, where a steal would be nice, but isn't completely necessary - curlers call it the conservative steal attempt

With the Hammer
When you have the hammer, your life is actually more complicated. You have more decisions to make, and your the options for an end plan are much more diverse.
Generally, your plan with the hammer is to score two points. Scoring one point is acceptable, giving up a steal is not acceptable. So with this plan in mind, what do you do with your lead rocks?

Option One: They Go Into The House, You Hit It
If the other team throws their first rock in the house, you can do a couple of things, as I mentioned above. If you hit that rock, you are likely to have an open end, which means that scoring one (which is the acceptable outcome) is very likely. However scoring two (the desired outcome) is not as likely. 

Option Two: They Go Into The House, You Throw A Corner Guard

In order to increase your chances of scoring multiple points, I would recommend throwing the unheralded guard: the corner guard.
The corner guard is a gaurd that is thrown near the side of the sheet, blocking the the eight foot on one side of the sheet or the other. This is a low-risk, high-reward guard when you have the hammer. It is low-risk because it doesn't block up the middle, therefore leaving it open for your last draw. It is high-reward because it gives you something to hide behind, possibly generating multiple scoring rocks, without getting anything too complicated.

Option Three: They Throw A Centre Guard, You Go Around It

If your opponent throws a centre guard, you can go around it. But, you must ensure that this rock is placed correctly: anything in the top of the house is great, anything in the back of the house is acceptable, but it is too early in the end to go into the four-foot. Keep the scoring area as wide-open as possible: you don't want to limit your opportunities early in the end. 

Option Four: They Throw A Centre Guard, You Go To The Wings

Another option if they throw a guard is to go to the side of the sheet (the wings); either into the house, or in a corner guard position. You are keeping the middle more open, but you are giving your opponent the first chance to hide behind their centre guard. 

Recap

These are the main options for your lead rocks, here is a quick summary:
Without the hammer:

1. Throw a guard. (If you want or need to steal, or don't want to go hit-for-hit with the opponent.)
2. Draw to the four-foot (If you want an open end, without a high possibility of a steal, but a low possibility of a mulitple-point score by your opponent.

With the hammer:

(If they throw into the four-foot:)
1. Hit it. This will keep the end open, and uncomplicated.
2. Throw a corner guard. You are still keeping the middle fairly open, but you have a low-risk guard to hide behind.

(If they throw a guard:)
3. Draw around it. Remember to keep it high in the house, or in the back of the house. Avoid the four-foot!
4. Go to the side of the sheet. Moving the play to the sides is a good idea, but your opponents may hide around the centre line guard first. 


The lead is the secret weapon on your team. If they are able to put their rocks in the right place you are well on the way to accomplishing your team's plan for the end!

Sunday, February 3, 2013

Fine Tuning: Grip, Rotation and Release


As a curler, you are constantly working to improve your delivery. Making sure that you are sliding straight at the broom, with your hips and shoulder square, your sliding foot in the right position and your trailing leg following correctly is an ongoing process. Even at the highest levels of the game, the elite athletes are always working on how they throw the rock. For them however, it is less about their slide, and more about fine tuning. In other words, when a curler feels that their slide is solid, they must move onto polishing the very specific details. Fine tuning in a curling delivery usually consists of three main aspects: grip, rotation and release.

Grip refers to the manner in which you hold your rock during the slide. When a curler is first starting out, this is not always an important aspect of the delivery: sliding out accurately at the broom, with the desired speed is much more important. However when top curlers look to improve their delivery by making small tweaks, grip is one area they may investigate.

There is a specific grip that is suggested is ideal for curlers. When you look at the palm of your hand, on your fingers you may notice three distinguished sections or "pads". In in an ideal grip, the middle pad is what goes directly under the handle of the rock. The fingers are placed fairly close together, about halfway down the handle (between the gooseneck and the end of the handle). The fingers are then wrapped around the handle, with the thumb resting on the opposite side. A high wrist is also recommended, to help with the release section, which we will get to later.


The rock should be positioned in the correct turn for the duration of the slide before release. For a right-handers' in-turn, the handle of the rock should point to the 10 o'clock position, while a right-handers' outturn should be pointing at the 2 o'clock position. If the rock is turned any more, or less, it will impact the amount of rotation is placed on the rock, which will be discussed next.

Ok, so now your slide is accurate and you have your rock gripped properly in your hand. The next fine-tuning point to consider is rotation, or in other words, the number of turns or spins your rock takes while travelling down the sheet. Ideally, the rock will rotate between 2.5 and 3 times while travelling down the sheet. As I mentioned in the grip section, if your grip has the rock at a larger angle (at about the 9 or 3 o'clock position) you will over-rotate upon release, and therefore the rock will likely rotate more than three times while travelling down the sheet. The opposite is also true: if you are not gripping the rock at enough of an angle (holding it 11 or 1 o'clock) you likely don't have enough rotation on your rock upon release, and therefore it will spin less times while in motion. 

The result of a rock that has fewer rotations is generally that it will curl much more, and therefore will not travel as far.
The result of a rock that has more rotations is generally that it will curl much less, and therefore travel further. 

The final and most difficult element of fine-tuning your curling delivery is the release itself. This is however, perhaps the most crucial element in determining the path that your rock will take when it is travelling down the ice. If you are holding the rock correctly, with a nice high wrist, and your rock is the proper position while you are sliding (either at 10 or 2 o'clock) then the release - in theory - is fairly straightforward. Simply turn the rock towards 12 o'clock, and when it reaches that point open your fingers, into a handshake motion, thereby releasing the rock. Sounds simple, right? Well, the truth is: it's not.


Some big questions are when you should begin turning the rock, and how long it should take to travel from the turned position to the release position of 12 o'clock. These may seem like small details, but they are an important part of fine-tuning because this process does have an impact on the path of your rock. The ideal length for a curler to apply the turn is about a broom's length (4 or 5 feet). This means that your rock should remain in its turned position (10 or 2 o'clock) until you are about a broom's length away from releasing. If you are turning your rock for longer than this, you are likely going to under-rotate your release, resulting in a "soft" release, and less rotations. If you are releasing in a shorter distance than a broom's length, your release is likely too stiff, resulting in an over-rotating rock, sometimes called a "spinner".

The ideal result is a properly gripped rock, with a release taking about a broom's length to complete, resulting in a rock that rotates about 2.5 - 3 times as it travels down the sheet. This is the goal, but even at the highest levels curlers are constantly working away to fine-tune their grip, rotation and release in order to achieve this goal.