Showing posts with label Guards. Show all posts

Saturday, February 9, 2013

The Good and Bad of the Corner Guard

The corner guard is perhaps the unsung hero in the game of curling. It doesn't always have the impact on an end of a centre-line guard, the dramatic flair of a draw to the button, and certainly none of the razzle dazzle that comes with a big weight runback. But the best thing about a corner guard is that if you employ it properly, when you have the hammer, it is a low-risk, high-reward weapon that can help you on the way to a victory.

As I said above, you must employ the corner guard properly for it to be effective. The low-risk side of the guard is that it does not close down your opportunity to draw to the four-foot with your final rock of the end. The high reward that comes with a corner guard is that you have something to hide rocks behind - the more rocks you have in the house, with an open four-foot, the more likely you are to score multiple points. Here the corner guard can be an offensive force. This begins with rock placement. In my opinion, there are two main places you want to place your corner guard.

First Option: Tight and Close. 


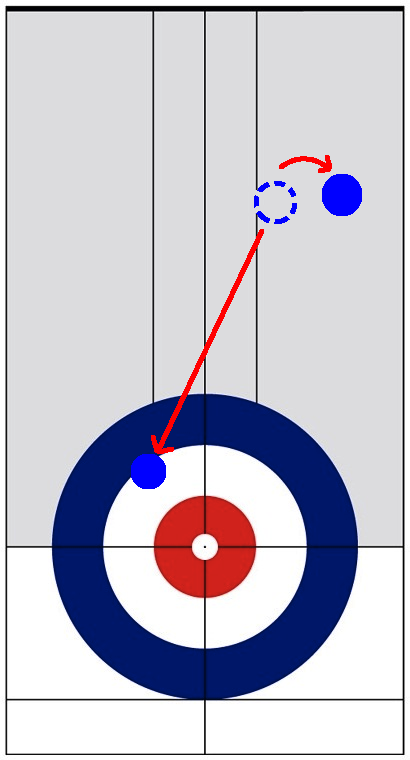
In this first option, you bring your corner guard close to the house, right around the four-foot line. This leaves you with multiple options as the end progresses. First, you can tap this rock back, or run it back into an opponent rock, as indicated by the red arrow. Since it is nice and tight to the rings, the runbacks become that much easier.


But, since it is on the four-foot line, you are also able to draw into the four-foot from the open side, but also from the outside, as shown by the green arrow. The key to the corner guard is that it is low risk. When you have the hammer the ideal situation is for the centre of the ice to be open, leaving an easy draw to the button if anything goes wrong. This corner guard does have some risk - while it leaves a draw on both turns, it makes one turn slightly more difficult. However sometimes to score some points you need to take a little bit of risk. Throwing this guard gives you a good chance to score multiple points, without taking a whole lot of risk. 


Second Option: Wide and Half-Way.

This is one of my favourite rocks to utilize when I am skipping. In this case the rock is about halfway between the house and the hog line, covering the outside edge of the eight-foot, and all of the twelve-foot. This guard is high enough that you can bury multiple rocks behind it, but not so high that an opponent can tap out a buried rock.

Since it is farther away from the house, it is more difficult to use as a rock to tap or runback, but the true beauty of this guard is that there is essentially no risk in throwing it. As the green arrow shows, there is room to draw to the button past this guard. This means that even if everything goes wrong in the end, this guard is not in the way of your bail-out draw to the button on the last rock.


The Bad: Getting In The Draw Path. 


The biggest mistake you can make when throwing the corner guard is to leave it halfway Option One and Option Two. In this scenario, you are blocking the path the button on one half of the sheet. This essentially means that your opponent only has to worry about cutting off the other side of the sheet, and then you are in a world of trouble when it comes to skip's rocks. 

A corner guard in this situation is arguably worse than even throwing a centre guard. But, it is only a few feet away from either option above, so you are likely to face this scenario if you attempt the corner guard often.

If it ends up here, what can you do to help yourself out?


Making Good From Bad: Tap and Roll


I give the same advice here that I do if you accidentally throw a centre guard when you have the hammer. On your next shot, simply tap this poor guard into the house, and roll the shooter into a better location. Instead of playing with a bad guard, make two good shots with one throw: get a rock in the house, and get a corner guard in a great location.

Now that your corner guard is in place, use it well. Some teams know where to throw their corners, but then they forget about them for the rest of the end. Obviously your play may change a bit depending on what your opponents are making, but the corner guard can be your ace in the hole: it is a low-risk, high-reward chance to put some points on the scoreboard!


Tuesday, February 5, 2013

Lead Rocks: Where Do I Go?


I have always said that maybe the most important rocks of an end come right at the start: the lead rocks. While these shots aren't always as complicated as some shots that may come later in the end, they are vital in establishing the team's plan for the end. A well-placed lead stone can really pave the way for a team in completeting their desired result for the end. Conversly an ill-placed stone may have that team chasing right off the bat.
So the question is, where should I put my lead rocks? The answer depends entirely on your team's goal for the end. These goals should be established in team practices before the game, and then quickly reiterated before an end begins.

Without the Hammer

Option One: Throw a Guard
Without the hammer, your goal could be to steal. This will happen often when you are losing in a game, or sometimes when the game is close. In order to steal, you will want to place your lead's first rock in the free guard zone, on the centre line. The second lead rock will then be a come-around to land behind that guard. This set-up closes down the scoring area for your oppenant, bringing play into the centre of the ice, and into the four-foot circle. The smaller you can make the scoring area, the greater the oppourtunity you will have to steal the end.
If you are really desperate to steal, you will want to place two guards on the centre line, so you must leave room for this to happen. Many teams will throw their first guard close to the house, on the centre line for the first lead rock, with the second lead rock being a guard of that guard, further away from the house and close to the hog line. With these two guards in place, the opponent will have a more difficult time clearing the front of the house, which will often be their goal.

Option Two: Draw Into the Four Foot
As I said, your goal for an end where you don't have hammer will not always be to steal the end. In many situations going for the steal is too risky, and therefore you should be working simply to limit your opponent to one point. For this plan, many teams choose to throw the first rock of the end into the top of the four-foot. This forces your oppenent to choose one of two options:
1. Hit the rock. This will likely result in an exchange of hits for the duration of the end, with a very open house.
2. Throw a corner guard. You will likely respond with a centre guard, and then the end gets complicated. You have a chance to steal because of your set-up, but they also have a chance to score two, because there are multiple rocks in play.
Another option is to throw that same centre guard, as if you needed to steal, but be ready to bail out as soon as you need to. This can be aided by bringing the guard as close to the house as possible: a short run-back is almost easier than a long run-back. This is usually a good game plan for a close game, where a steal would be nice, but isn't completely necessary - curlers call it the conservative steal attempt

With the Hammer
When you have the hammer, your life is actually more complicated. You have more decisions to make, and your the options for an end plan are much more diverse.
Generally, your plan with the hammer is to score two points. Scoring one point is acceptable, giving up a steal is not acceptable. So with this plan in mind, what do you do with your lead rocks?

Option One: They Go Into The House, You Hit It
If the other team throws their first rock in the house, you can do a couple of things, as I mentioned above. If you hit that rock, you are likely to have an open end, which means that scoring one (which is the acceptable outcome) is very likely. However scoring two (the desired outcome) is not as likely. 

Option Two: They Go Into The House, You Throw A Corner Guard

In order to increase your chances of scoring multiple points, I would recommend throwing the unheralded guard: the corner guard.
The corner guard is a gaurd that is thrown near the side of the sheet, blocking the the eight foot on one side of the sheet or the other. This is a low-risk, high-reward guard when you have the hammer. It is low-risk because it doesn't block up the middle, therefore leaving it open for your last draw. It is high-reward because it gives you something to hide behind, possibly generating multiple scoring rocks, without getting anything too complicated.

Option Three: They Throw A Centre Guard, You Go Around It

If your opponent throws a centre guard, you can go around it. But, you must ensure that this rock is placed correctly: anything in the top of the house is great, anything in the back of the house is acceptable, but it is too early in the end to go into the four-foot. Keep the scoring area as wide-open as possible: you don't want to limit your opportunities early in the end. 

Option Four: They Throw A Centre Guard, You Go To The Wings

Another option if they throw a guard is to go to the side of the sheet (the wings); either into the house, or in a corner guard position. You are keeping the middle more open, but you are giving your opponent the first chance to hide behind their centre guard. 

Recap

These are the main options for your lead rocks, here is a quick summary:
Without the hammer:

1. Throw a guard. (If you want or need to steal, or don't want to go hit-for-hit with the opponent.)
2. Draw to the four-foot (If you want an open end, without a high possibility of a steal, but a low possibility of a mulitple-point score by your opponent.

With the hammer:

(If they throw into the four-foot:)
1. Hit it. This will keep the end open, and uncomplicated.
2. Throw a corner guard. You are still keeping the middle fairly open, but you have a low-risk guard to hide behind.

(If they throw a guard:)
3. Draw around it. Remember to keep it high in the house, or in the back of the house. Avoid the four-foot!
4. Go to the side of the sheet. Moving the play to the sides is a good idea, but your opponents may hide around the centre line guard first. 


The lead is the secret weapon on your team. If they are able to put their rocks in the right place you are well on the way to accomplishing your team's plan for the end!